How to Implement UNet in PyTorch for Image Segmentation from Scratch?
A Step-by-Step Guide to Implementing UNet in PyTorch from Scratch
In this tutorial, we'll explore the power and walk through the implementation of UNet, one of the most popular and effective architectures for semantic segmentation in computer vision. Whether you're new to UNet or a seasoned pro, you'll discover new insights, tips, and techniques for building accurate and efficient segmentation models using PyTorch.
Are you ready to take your image segmentation skills to the next level? So buckle up and get ready to unleash your creativity with UNet!
Introduction
What is image segmentation?
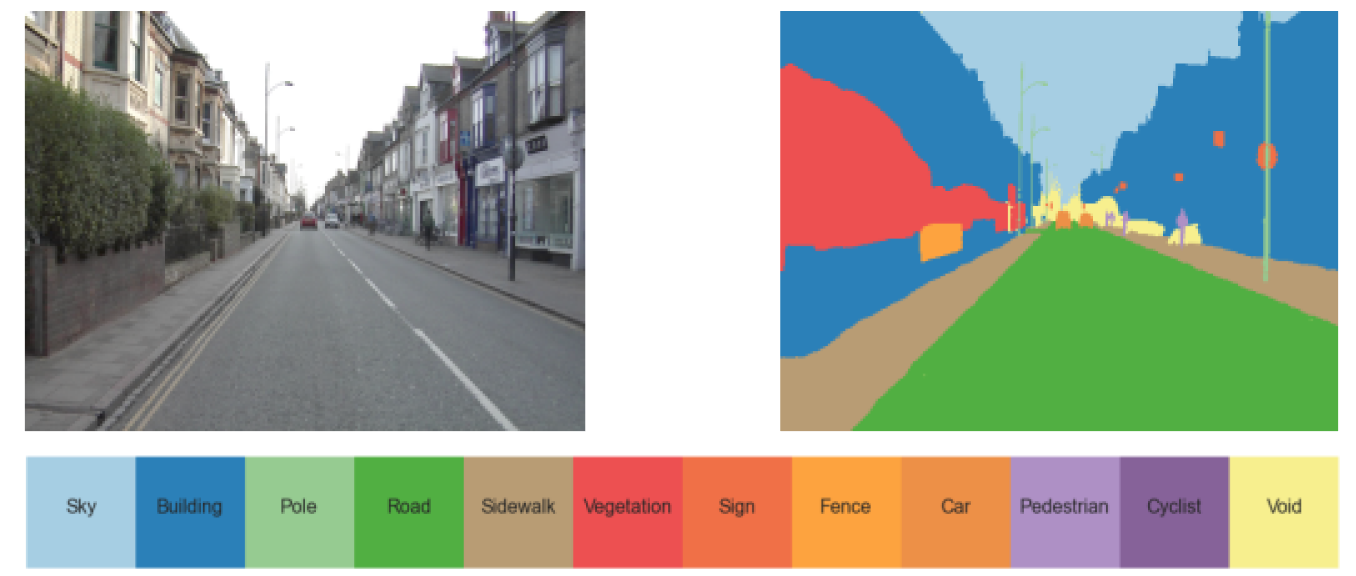
Image segmentation is the process of partitioning a digital image into multiple image segments, also known as image regions or image objects (sets of pixels), each of which corresponds to a different object or part of the image.

Figure: Road Image segmentation
The goal of segmentation is to simplify and/or change the representation of an image into something that is more meaningful and easier to analyze. Image segmentation is typically used to locate objects and boundaries (lines, curves, etc.) in images.
More precisely, image segmentation is the process of assigning a label to every pixel in an image such that pixels with the same label share certain characteristics¹.
Convolutional Neural Networks (CNNs) have been instrumental in achieving state-of-the-art results in various computer vision tasks. However, when it comes to segmentation tasks, such as image segmentation or semantic segmentation, CNNs face a significant challenge. This is because segmentation requires precise localization of objects in an image. Traditional CNNs, with their fully connected layers, are not well-suited for such tasks.
To overcome this limitation, Ronneberger et al. proposed UNet, a fully convolutional neural network, which has shown remarkable success in image segmentation tasks.
A brief overview of UNet model architecture
UNet is a popular deep-learning architecture that has been shown to achieve state-of-the-art performance on various image segmentation tasks.

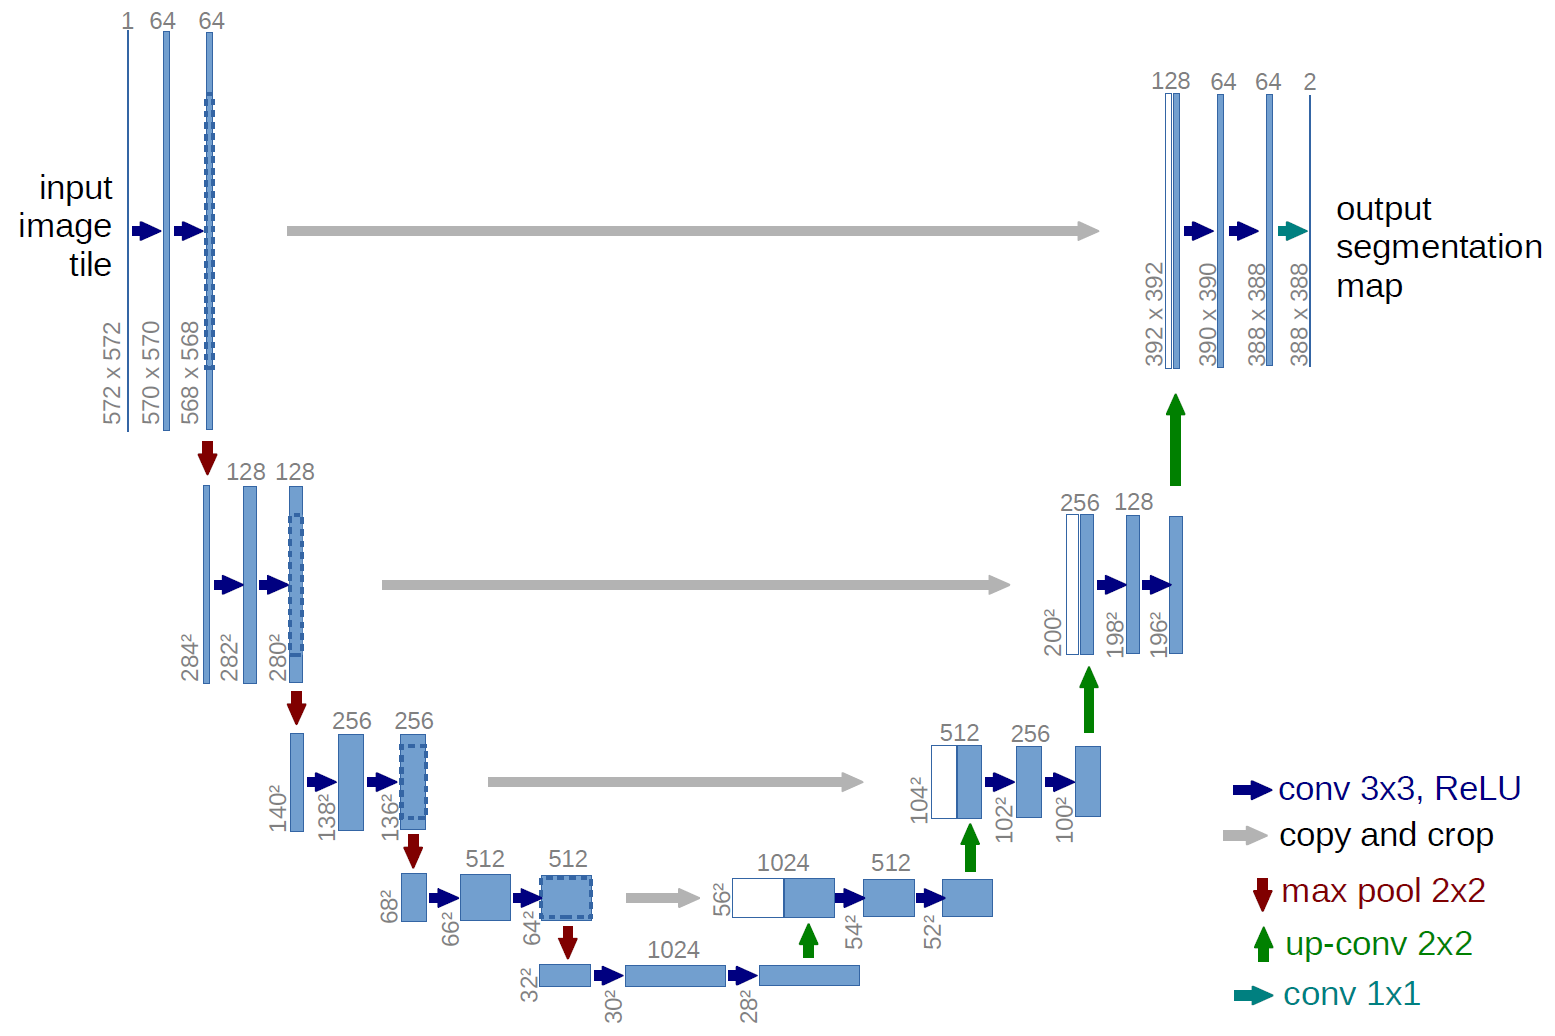
Figure: U-net architecture (example for 32x32 pixels in the lowest resolution). Each blue box corresponds to a multi-channel feature map. The number of channels is denoted on top of the box. The x-y-size is provided at the lower left edge of the box. White boxes represent copied feature maps. The arrows denote the different operations.
The U-Net is a fully convolutional neural network architecture that comprises an encoder and a decoder, with skip connections for accurate and efficient image segmentation. It has gained popularity due to its ability to produce fast and precise segmentation results.
It consists of a contracting path(encoder) and an expansive path(decoder).
The contracting encoder of the U-Net model includes a series of convolutional and pooling layers to downsample the input image and extract its features. This section follows the conventional architecture of a convolutional neural network, with two 3x3 unpadded convolutional layers followed by a ReLU activation function and a 2x2 max pooling operation with a stride of 2.
Additionally, at each downsampling step, the number of feature channels is doubled.
Similarly, the expansive decoder part of the U-Net architecture consists of a series of transposed convolutional and concatenation layers. It is responsible for upsampling the feature maps and combining them with the corresponding feature maps from the encoder part to produce the final segmentation map.
Each step in the expansive path involves first upsampling the feature map, followed by a 2x2 convolution (also known as "up-convolution") that halves the number of feature channels. Next, the upsampled feature map is concatenated with the corresponding feature map from the contracting path, and two 3x3 convolutions are applied, each followed by a ReLU activation function.
The U-Net architecture has skip connections between the encoder and decoder parts, which help to preserve the high-resolution details of the input image during the upsampling process.
These skip connections concatenate the feature maps from the encoder with those from the decoder at the corresponding spatial resolution, allowing the decoder to refine the segmentation map with the information from the encoder.
PyTorch Implementation of U-Net for Image Segmentation
In this tutorial, I will guide you through the step-by-step implementation of U-Net in PyTorch for image segmentation tasks.
The implementation will cover the following steps:
- Defining the double convolution block
- Implementing the encoder with downsampling
- Implementing the decoder with skip connections and upsampling
- Finalizing the U-Net architecture
1. Defining the double convolution block
The double convolution block is a basic building block of the U-Net architecture. It consists of two 3x3 convolutional layers, each followed by a rectified linear unit (ReLU) activation function. This block is used multiple times throughout the encoder and decoder to extract and process features from the input image. Here's the implementation of the double convolution block in PyTorch:
In this implementation, I have also included batch normalization so as to improve the performance and training speed of neural networks.
import torch
import torch.nn as nn

class DoubleConvBlock(nn.Module):
    """ A convolutional block in the UNet architecture.

    This block consists of two convolutional layers with batch
		normalization followed by a ReLU activation function.
    """

    def __init__(
        self,
        in_channels: int,
        out_channels: int,
        kernel_size: int = 3,
        padding: int = 0, # set padding to 1 to preserve the original dimension
    ) -> None:
        """ Initializes DoubleConvBlock with specified input and output channels,
				kernel size, and padding.
        """
        super(DoubleConvBlock, self).__init__()
				self.conv = nn.Sequential(
				            nn.Conv2d(in_channels, out_channels, kernel_size, padding),
										nn.BatchNorm2d(out_channels)
				            nn.ReLU(inplace=True),
				            nn.Conv2d(out_channels, out_channels, kernel_size, padding),
										nn.BatchNorm2d(out_channels)
				            nn.ReLU(inplace=True)
					        )

    def forward(self, x) -> torch.Tensor:
        x = self.conv(x)
        return x
2. Implementing the encoder:
The encoder is part of the U-Net architecture that downsamples the input image and extracts its features. It consists of a series of double convolution blocks followed by max pooling layers. The number of feature channels is doubled at each downsampling step. Here's the implementation of the encoder in PyTorch:
class Encoder(nn.Module):
    """The encoder part of the UNet architecture.

    This consists of a series of convolutional blocks followed by
		maxpooling operations..

    Args:
        channels (List[int]): A list of channels for convolutionals block.
				>>>channels = [3, 64, 128, 256, 512, 1024]

    """

    def __init__(self, channels: List[int]) -> None:
        super(Encoder, self).__init__()
        self.encoder_blocks = nn.ModuleList()

        # Add a convolutional block followed by maxpooling(except last one) for each level
        for i in range(len(channels)-1):
            self.encoder_blocks.append(
                DoubleConvBlock(channels[i], channels[i+1])),

            # Add a max pooling layer after each convolutional block except the last one
            if i < len(channels)-2:
                self.encoder_blocks.append(nn.MaxPool2d(kernel_size=2))

    def forward(self, x: torch.Tensor) -> List[torch.Tensor]:
        encoder_features = []
        for encoder_block in self.encoder_blocks:
            x = encoder_block(x)

            # Save the output of each convolutional block
            if isinstance(encoder_block, DoubleConvBlock):
                encoder_features.append(x)

        return encoder_features
3. Implementing the decoder with skip connections:
The decoder is the part of the U-Net architecture that upsamples the feature maps and combines them with the corresponding feature maps from the encoder to produce the final segmentation map. It consists of a series of transposed convolutional layers followed by concatenation with the corresponding feature maps from the encoder, and double convolution blocks to process the combined feature maps. Here's the implementation of the decoder with skip connections in PyTorch:
class Decoder(nn.Module):
    """The decoder part of the UNet architecture.

    This consists of a series of convolutional blocks with decreasing number of channels.

    Args:
        channels (List[int]): A list of channels for convolutionals block.
				>>>channels = [1024, 512, 256, 128, 64]

    """

    def __init__(self, channels: List[int]) -> None:
        super(Decoder, self).__init__()
        self.decoder_blocks = nn.ModuleList()

        # Add a upconvolutional followed by a double convolutional block for each level
        for i in range(len(channels)-1):
            self.decoder_blocks.append(nn.ConvTranspose2d(
                channels[i], channels[i+1], 2, 2))
            self.decoder_blocks.append(
                DoubleConvBlock(channels[i], channels[i+1]))

    def _center_crop(self, feature: torch.Tensor, target_size: torch.Tensor) -> torch.Tensor:
        """Crops the input tensor to the target size.
        """
        _, _, H, W = target_size.shape
        _, _, h, w = feature.shape

        # Calculate the starting indices for the crop
        h_start = (h - H) // 2
        w_start = (w - W) // 2

        # Crop and returns the tensor
        return feature[:, :, h_start:h_start+H, w_start:w_start+W]

    def forward(self, x: torch.Tensor, encoder_features: List[torch.Tensor]) -> torch.Tensor:

        for i, decoder_block in enumerate(self.decoder_blocks):

            # Concatenate the output of the encoder with the output of the decoder
            if isinstance(decoder_block, DoubleConvBlock):
                encoder_feature = self._center_crop(encoder_features[i//2], x)
                x = torch.cat([x, encoder_feature], dim=1)

            # Apply the upconv or double convolutional block
            x = decoder_block(x)
        return x
4. Final U-Net architecture:
The final U-Net architecture consists of an encoder and decoder with skip connections. The encoder downsamples the input image and extracts its features, while the decoder upsamples the feature maps and combines them with the corresponding feature maps from the encoder to produce the final segmentation map. Here's the implementation of the final U-Net architecture in PyTorch:
class UNet(nn.Module):
    """The UNet architecture.

    Args:
        out_channels (int): The number of output channels.
        channels (List[int]): A list of channels for convolutionals block.

    Example:
        >>> model = UNet(channels=[3, 64, 128, 256, 512], out_channels=1)
    """

    def __init__(
        self,
        channels: List[int],
        out_channels: int,
    ) -> None:
        super(UNet, self).__init__()
        self.encoder = Encoder(channels)
        self.decoder = Decoder(channels[::-1][:-1])
        self.output = nn.Conv2d(channels[1], out_channels, kernel_size=1)

    def forward(self, x: torch.Tensor) -> torch.Tensor:
        """Forward pass of the UNet architecture.
        """
        encoder_features = self.encoder(x)[::-1]
        x = self.decoder(encoder_features[0], encoder_features[1:])
        x = self.output(x)
        return x

# test the model
model = UNet(channels=[3, 64, 128, 256, 512, 1024], out_channels=1)

# input tensor
x = torch.randn(1, 3, 572, 572)
y = model(x)
print(y.shape) #-> torch.Size([1, 1, 388, 388])
Conclusion
In conclusion, UNet is an incredibly useful and efficient architecture for semantic segmentation in computer vision. In this tutorial, we have covered a step-by-step guide on how to implement UNet in PyTorch from scratch. The guide covered the fundamental concepts of image segmentation, the architecture of UNet, and the PyTorch implementation of UNet for image segmentation tasks.
I hope that this tutorial has helped you understand the basics of UNet and how to implement it in PyTorch for your own image segmentation projects. In the upcoming tutorial, I will cover the training part of UNet in PyTorch to complete the implementation process. Stay tuned.
References:
[1] Image segmentation. Wikipedia. https://en.wikipedia.org/wiki/Image_segmentation
[2] Ronneberger, O., Fischer, P., & Brox, T. (2015). U-Net: Convolutional Networks for Biomedical Image Segmentation. ArXiv/abs/1505.04597
[3] PyTorchUNet. GitHub. PyTorchUNet : A PyTorch Implementation of UNet Architecture for Semantic Segmentation of Images from scratch.